Seite 1 von 3

Zmodell novelties 2025

Verfasst: Fr 22. Aug 2025, 22:01
von Alex_dn
Greetings to all,

I would like to introduce the new products I developed and produced in this year. As many of you know, the scope of my products is not limited only to digital decoders, but also consists of a very wide range of load inserts for the most types of freight rolling stock in Z scale as well as a number of useful accessories.

In the beginning of this year, I decided to develop a number of products that were still missing in Z scale and often substituted on Z scale layouts with N scale analogues which is, obviously, a compromise that often occurred due to the lack of choice. Unfortunately, my personal situation did not allow me to introduce all the novelties earlier, but, of course, as they say, it is better later than never.

The number of novelties is quite significant – that’s why I decided to describe them all together in a separate thread.

Load inserts

ZM-MRK-SGNS-006 – Load insert for type SGNS 4-axle flatcar


Right after announcement of type SGNS flatcars by Märklin, I decided to dig about what other goods except containers are transported on these flatcars. I found out that they are often used for transporting wood and pipes. For this, they are fitted with removable stake frames on which mentioned loads are stacked and fixed with special fabric or metal belts or even with chains. Here is a number of real life samples:

Wood:

Bild
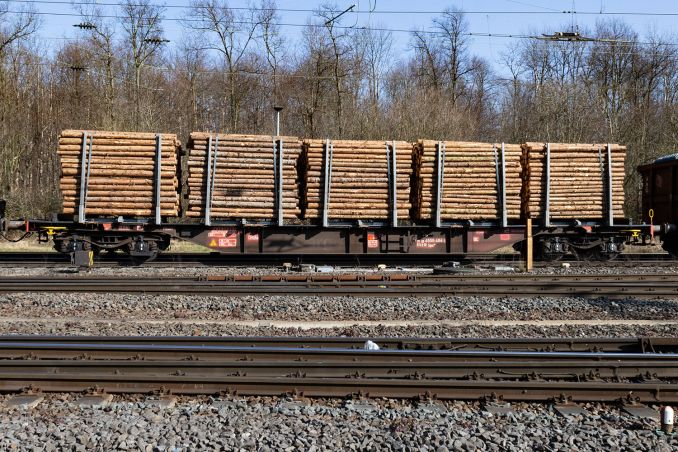
https://www.ummet-eck.de/Bilder/eisenba ... 220305.jpg

Bild
https://www.innofreight.com/wp-content/ ... system.jpg

Pipes:

Bild
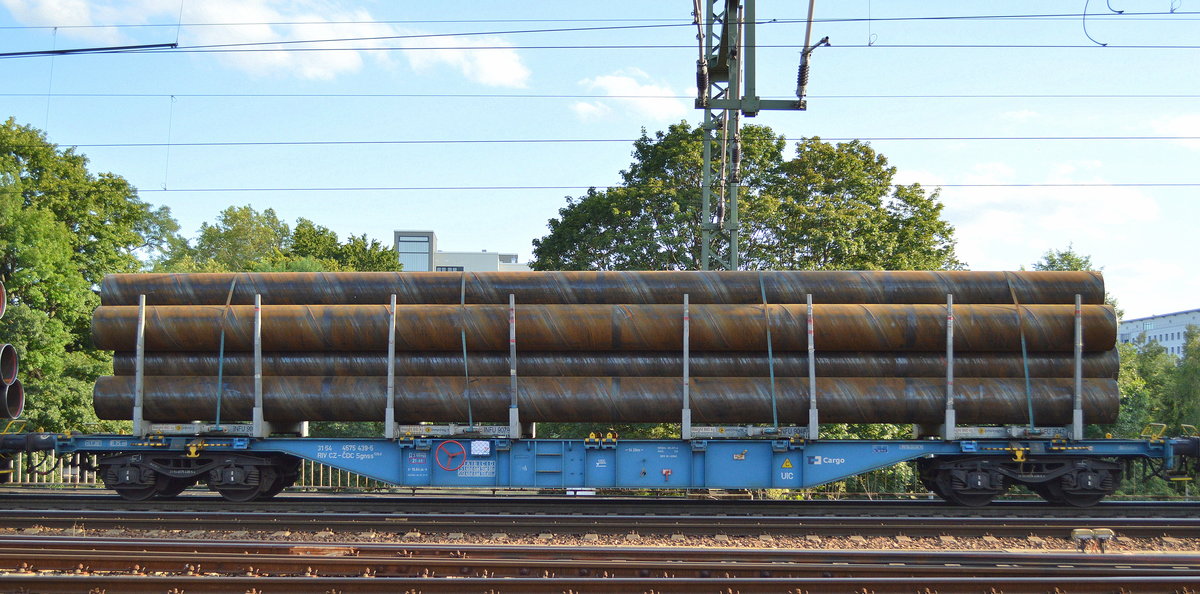
https://www.bahnbilder.de/1200/drehgest ... 155821.jpg

Bild
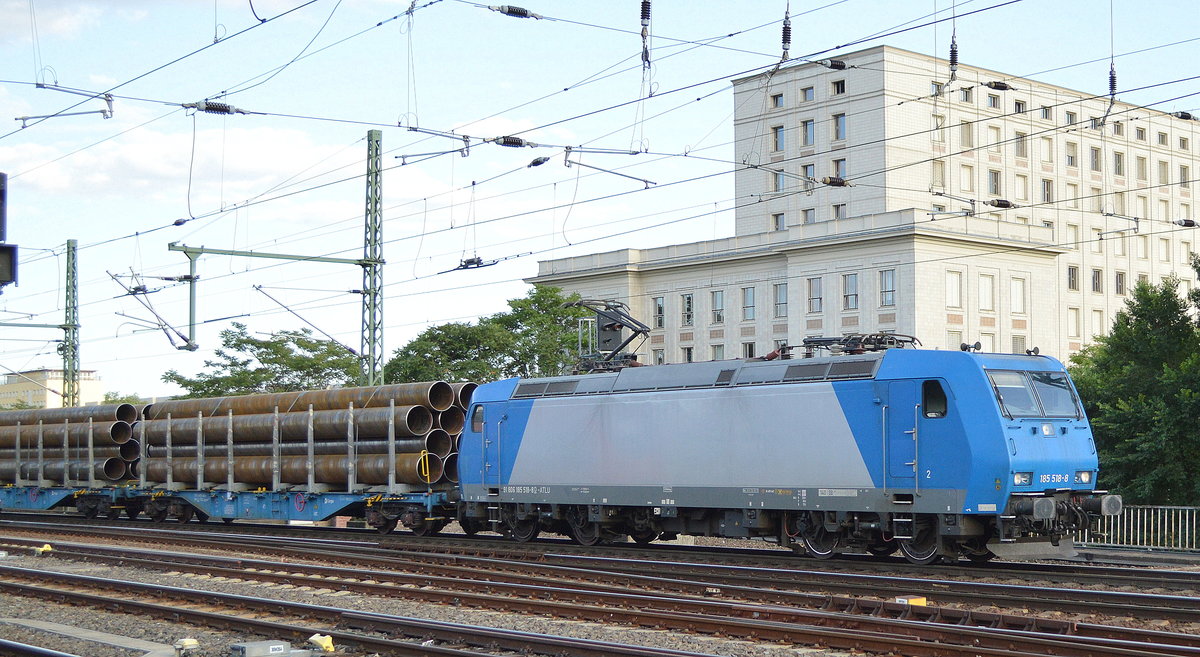
https://www.bahnbilder.de/1200/cfl-carg ... 155820.jpg

I decided to enrich the assortment of loads for type SGNS flatcars and started from stacked wood trunks. The main challenge was to find out the optimal construction of the staked framework. After certain considerations, I decided to make it from photo-etched metal. This time, together with my colleagues in Kiev, Ukraine, we pushed the photo-etching technology to previously unseen limits – the framework of the load insert is made of 0.8 mm brass. Such a thick material delivers better strength and more prototypical look.

The framework consists of several parts – the base plate and a number of double stakes. They are joined together using SMD soldering technology – the same process that is used in production of circuit boards. A special soldering paste is applied in the grooves of the base plate; after this, the parts are assembled together on a special rig and heated up with hot air soldering gun:

20250523_171522.jpg
20250523_171604.jpg

After this, ready frames are cleaned in the ultrasonic bath from soldering residues and airbrushed with yellow lacquer:

20250603_024801.jpg
20250603_024831.jpg

Here is how the empty frame looks on SGNS flatcar:

20250603_024729.jpg

The frame has small pins on the bottom side which fit into the holes on the flatcars (like containers) and prevent the load for sliding and falling away.

In the meantime, my colleague in Ukraine was busy making wooden loads themselves. We decided to select the wigs for this load even more finely than for type SNPS flatcar because the trunks are divided into 5 shorter sections in this case. As a result, an average thickness of wigs in this load is only between 1.2 and 2 mm. Each section of trunks is tied with thin silver plastic adhesive strip that imitates metal straps which can be seen on prototype photos above:

20250524_231327.jpg

Completely assembled load insert looks like this:

20250603_024528.jpg

And here is how the load looks on red DB type SGNS flatcar:

20250603_024223.jpg
20250603_025238.jpg
20250603_024402.jpg

Re: Zmodell novelties 2025

Verfasst: Fr 22. Aug 2025, 22:10
von Alex_dn
A consist of several SGNS flatcars loaded with wood and pulled by Vectron electric locomotive looks very modern and attractive:

20250603_021425.jpg
20250603_025627.jpg

Since the new load inserts are quite delicate, I developed the new rigid packaging for them:

20250604_224635.jpg

As you can see, the efforts needed to produce these loads are enormous, but I believe that the result is worth of them. The new load inserts are available here:
https://www.1zu220-shop.de/Zmodell/Lade ... 50022.html

ZM-MRK-SW-001L and ZM-MRK-SW-002L – Illuminated load inserts for metallurgical cars

Three years ago, I developed illuminated load inserts for two different metallurgical cars existing in Z scale – the crude iron ladle car and the slag car. They were powered by small 3V Lithium batteries. The reason for choosing batteries as a power source was because these car required too strong modifications to be powered from the tracks which would not be accepted by the most users:
viewtopic.php?p=248235

Although this development already became a welcomed innovation, it lacked one important feature – ability to switch the illumination on and off. The space inside these cars was too small to add even the smallest switch. As a result, it was necessary to insert and remove the batteries all the time which was still acceptable, but not very convenient compromise.

A couple years later, I decided to develop the second version of illuminated load inserts without mentioned shortcoming and also featuring some other improvements.

I would like to emphasize they key improvements of the new illuminated load inserts over the first version in the following list:

● Wireless switching using electronic magnetic sensor switch (not mechanical, chip-based);
● Higher brightness of LED and more uniform light distribution across the surface of the load insert;
● Different type of batteries used – 2x LR621 1.5V instead of one CR927 3V

Modern assortment of electronic components allows to build very small wireless switches that can fit even in such small items like Z scale load inserts. I used an extremely small low-power Hall Effect sensor switch fitted on a tiny circuit board that nearly matched the size of batteries used to power it. To turn on the LED, just move the magnet over the load insert at a distance of 1-2 cm. To switch off the light, do it again.

Here is how the new load inserts look. Top side:

20250815_232052.jpg

Bottom side:

20250815_232215.jpg
20250815_232227.jpg
20250815_232245.jpg

I decided to use a different type of LEDs in updated version – single bigger LED with wider angle of light distribution instead of three small SMD 0402 LEDs in the first version. The new LED illuminates the load insert very uniformly from the center to the edges:

20250815_233309.jpg

I must add some details about the construction here. As usual, the housing of the load insert is made of CNC-milled transparent acrylic glass that is covered with a layer of a very fine grade sand-based compound. The load insert features the real photo of molten iron printed on Mimaki UV printer. I still order the printing in Kiev, Ukraine. Different variations of photos are used, so it is almost unlikely that you get the load inserts with the same printed textures.

I took mentioned pictures many years ago – back in 2010-2012 at the metallurgical plant in my native city Donetsk in Ukraine. I described it here:
viewtopic.php?p=234121

Unfortunately, this plant is not working anymore already for a long time due to well-known circumstances, and red Taigatrommel locomotives no longer run on the line where I spent my childhood…

After UV-printing, the bottom and the sides of the housings are carefully airbrushed with two different layers of paint. Silver layer comes first – in order to form a reflective surface for better light distribution and also to protect the load insert from unwanted light leakage. Next, the housing is covered with the black layer that improves the light insulation even more and also hides silver layer from the edges. The previous picture above clearly proves that the light insulation leaves nothing to be desired.

I decided to switch to a different type of batteries and to use two LR621 1.5V batteries instead of one CR927 3V. The new batteries are much more common and also cheaper than CR927. One of the challenges when using more than one battery is how to isolate the metal holding bracket from one of the batteries. I cut special adhesive isolators from PVC sheet and attached them to the brackets from inside.

Like their non-illuminated analogues, the new loads fit perfectly in the cars. The LEDs are switched off on the following pictures:

20250815_232801.jpg
20250815_232917.jpg

Re: Zmodell novelties 2025

Verfasst: Fr 22. Aug 2025, 22:33
von Alex_dn
Now let’s turn the LEDs on. As you can see, the brightness of the new orange LEDs is so good that the illumination can be seen even in studio lighting conditions:

20250816_022550.jpg
20250816_021204.jpg

Here is how the new load inserts look in dark light conditions:

20250815_233037.jpg
20250815_233024.jpg
20250815_233111.jpg

Now it’s time to talk about wireless switching control of the new load inserts and some interesting possibilities it offers. It is possible to set up the automatic operation of the load inserts on layouts using magnets installed on the frames over the tracks. Possible scenario can be the following: the train with “empty” metallurgical cars slowly enters the blast furnace facility (for example, Märklin 89700: https://www.maerklin.de/de/produkte/det ... icle/89700), passes under the frame with Neodymium magnet and exits the blast furnace with cars filled with molten iron – with the LEDs switched on. Then the train proceeds towards the slag unloading facility, where the cars are being “unloaded” by passing under the next frame with magnet.

Suggested layout is shown on the following picture – as you can see, all this is possible both on analog and digital layouts:

Automation.jpg

I also prepared user’s manuals for these two items. They can be downloaded in “Downloads” tab on the product page, and also here:

ZM-MRK-SW-001L:
ZM-MRK-SW-001L_EN.pdf
(977.79 KiB) 11-mal heruntergeladen
ZM-MRK-SW-002L:
ZM-MRK-SW-002L_EN.pdf
(979.19 KiB) 5-mal heruntergeladen

The new load inserts are available here:

ZM-MRK-SW-001L:
https://www.1zu220-shop.de/Zmodell/Lade ... 50023.html

ZM-MRK-SW-002L:
https://www.1zu220-shop.de/Zmodell/Lade ... 50024.html

ZM-SWM-01

Although it is possible to switch the illumination of the load inserts with almost any magnet, I decided to offer a dedicated tool for this, too – a special strong Neodymium magnet with comfortable plastic handle:

20250815_233444.jpg

The distance above the loads should be approximately 1-2 cm. Of course, you should be a little careful, because if the distance is too small, the load inserts may simply stick to the magnet.

The article is available here:
https://www.1zu220-shop.de/Zmodell/Zube ... 50046.html

It also makes sense to mention other load inserts I introduced in March 2025 – the slab wood. These loads relate to 2025 novelties, too, and described here:
viewtopic.php?p=316623

Accessories

Zmodell ZM-TDB-01DE - Train departure board, Germany, Era V-VI


I would like to start introducing accessories from one of the most interesting and quite unique articles – modern illuminated train departure board. The prototype of this item is a big modern TFT screen matrix-based departure board at railway stations in Germany in V-VI Eras. Here are some samples from real life:

Düsseldorf:
Bild
https://rp-online.de/imgs/scaled/32/1/1 ... 767415.JPG

Stuttgart:
Bild
https://upload.wikimedia.org/wikipedia/ ... eitung.jpg

Kassel:
Bild
https://upload.wikimedia.org/wikipedia/ ... 3%B6he.JPG

The very first prototype of this article existed since 2018 – I assembled it when I was back in Ukraine. As you can see, it sometimes take several years for some projects to become “ripe” and come to fruition. I returned back to this project in the end of 2024 and decided to recreate it from scratch – using new technologies and new design approach.

Here is the construction layout of the departure board:

ZM-TDB-01DE-2.jpg

Re: Zmodell novelties 2025

Verfasst: Fr 22. Aug 2025, 22:40
von Alex_dn
Departure_Board.jpg

I decided to make the housing from polystyrene sheets precisely cut on CNC milling machine. Again, this very difficult task (due to extreme accuracy requirements) has been successfully completed by my old good colleague in Ukraine. The housing is made of 1.5 mm black polystyrene. The cover of the box is made of very thin 0.5 mm white polystyrene that was also CNC-processed. The cover also serves as the light diffusion filter that further improves the uniformity of the backlight:

20250503_224417.jpg

The most challenging task was to develop a good and reliable backlight that would also fit in such a small volume. Unfortunately, ready to use backlight solutions that can be seen, for example, in LCD wristwatches, cannot be used here due to too low brightness. Other existing backlight devices are expectedly too big. All this forced me to develop my own device-specific backlighting solution. I decided to use a very thin material for the circuit board – only 0.2 mm, and very small cool white SMD 0402 LEDs with a size of 1 x 0.5 mm. A total of as many as 84 LEDs has been populated on tiny 20 x 10 mm circuit board. My calculations showed that lower number of LEDs won’t provide desired uniformity of lighting:

20250503_223231.jpg

Now let’s turn the light on:

20250503_223407.jpg

The backlight can be powered by 8-15 volts DC. Surprisingly, the power consumption of this board is very low – only 3 mA at 12 volts.

At the next step, I designed the image of the departure board from scratch, based on real prototypes. After this, it has been printed on special plastic adhesive material on laser printer in highest possible resolution. Then the printout was precisely cut on the plotter:

20250503_224822.jpg

In order to increase the level of details, I decided to add the outer frame with windows – just like in the prototype. I made this part from 0.1 mm photo-etched nickel silver:

20250503_224728.jpg

It was incredibly difficult to bend the frames correctly because the bending lines are located very closely to the edges of material. Nevertheless, I managed to complete this step successfully. Finished frames were then airbrushed with deep blue lacquer and fitted with ultra-thin double-sided adhesive strips from inside. Please keep in mind that the size of this thing is only 20 x 10 x 2 mm:

20250503_224449.jpg
20250503_224524.jpg

Here is the set of different parts required to assemble one departure board:

20250503_224343.jpg

And here is a finished product with illumination turned on:

20250503_223750.jpg

Re: Zmodell novelties 2025

Verfasst: Fr 22. Aug 2025, 23:01
von Alex_dn
20250503_223818.jpg

Like in real life, two blocks can be combined together:

20250503_224123.jpg
20250503_224135.jpg

The boards can be mounted inside buildings and also outside. The size matches prototypical dimensions – the board is extremely thin – only 2 mm, and the cables are also very thin – I used 0.28 mm stranded flexible cables with PTFE insulation.

A pair of small double-sided adhesive stickers comes in the package – it can be used for mounting the departure board on the inner wall of the station building. The departure board will be very visible when installed in the following buildings – a copy of Göppingen railway station (Märklin 8960) or Faller 2712.

The departure board comes in a special small plastic box for additional protection:

20250503_225342.jpg

Here is a couple of photos depicting illuminated departure board in front of bi-level IC2 passenger car and a famous station building from Kibri:

20250503_234700.jpg
20250503_234720.jpg

User’s manual for the product can be downloaded in “Downloads” tab on the product page, and also here:
ZM-TDB-01DE_EN.pdf
(910.77 KiB) 7-mal heruntergeladen

The product is available here:
https://www.1zu220-shop.de/Zmodell/Zube ... 50047.html

ZM-LS-001 and ZM-LS-002L – Advertising columns

A couple of new interesting articles is ready – advertising columns in two different styles, retro and modern. Both variants feature exceptional level of details, especially the retro version – I implemented an old style design from the beginning of XX century with all smallest details – even the tiles on the roof were modeled. The columns consist of three parts – base, tube and top. Base and top parts are 3D printed, while the tubes are made of white polystyrene:

Construction.jpg

The retro style column is painted with RAL 6005 “Moss Green” lacquer paint:

20250725_205945.jpg

I was inspired by the following existing prototypes:

Bild
https://pbs.twimg.com/media/FF1xkijX0AA ... name=large

Bild
https://as2.ftcdn.net/jpg/03/91/21/89/1 ... AnHf5s.jpg

I designed four different variants of advertisements that can be applied onto the advertisement column according to customer’s choice – two in retro style and two in modern:

Litfaßsäule1.jpg

For the first time, I used AI image generator for this. Each single poster was generated separately in multiple variants from which I selected the best looking one. After this, posters have been combined into different sets and printed on special plastic adhesive sheets.

The reasons of using AI for creating posters are pretty obvious: a) It would take too much time to design them manually (I would literally need around hundred hours to create all this from scratch); b) While resulting images look very natural, they are guaranteed to be 100% free from any possible copyright issues, even if they contain human portraits or text labels.

However, it was not so easy to achieve satisfying results – the AI technology is still far from ideal, so it took a lot of time to “teach” it to do what I want. Fun fact: when I asked to create a poster of science fiction movie with superheroes, it portrayed a group of Iron Man clones all the time :D It looks like AI engines know no superheroes other than the Iron Man :)

Re: Zmodell novelties 2025

Verfasst: Fr 22. Aug 2025, 23:20
von Alex_dn
Here is a 3D render of four possible variants of retro style columns with applied different stickers:

Litfassaule_Retro.jpg

Of course, it is possible to create your own design. The size of the sticker is 20.2 x 12.5 mm. Here is a picture of finished model with applied sticker in retro style:

20250725_205357.jpg

The column comes already assembled and features a double-sided adhesive label on the bottom for easier installation:

Litfaßsäule1_1.jpg

The second variant of the advertising column is in modern style. The design is inspired by real prototypes which can be seen nowadays very often in many cities in Germany:

Bild
https://www.wtm-aussenwerbung.de/wp-con ... ten-kl.jpg

Bild
https://www.wtm-aussenwerbung.de/wp-con ... 80x614.jpg

Bild
https://www.wtm-aussenwerbung.de/wp-con ... 80x552.jpg

The top and the bottom parts of the column are airbrushed with different prototypical colors: the bottom part has “weathered concrete” color, while the top is painted in metallic gray. It is worth noting that both parts also have a silver layer underside in order to be non-translucent for the light from the internal LED:

20250725_205540.jpg

The modern variant has additional feature – it can be illuminated. I decided to hide all electronic components inside the column. There is a small flangeless cool white LED inside the column with wide light diffusion angle for uniform illumination. The LED is already shunted with SMD resistor and it can be connected directly to 8-15V DC power source. 12 volts is recommended:

20250714_043640.jpg

The LED is fixed in the base with epoxy glue:

20250721_185054.jpg

The column comes already assembled:

20250725_205909.jpg

I designed four different variants for the modern advertising column, too:

Litfaßsäule2.jpg

I also used AI image generator in this case, but the images are different from those used for the retro variant. Here is a 3D render of four possible variants of modern style columns with applied different stickers:

Litfassaule_Modern.jpg

Custom designs can be made, too – the size of the sticker is 17.8 x 16 mm. The column features double-sided adhesive on the bottom as well:

Litfaßsäule2_1.jpg

Re: Zmodell novelties 2025

Verfasst: Fr 22. Aug 2025, 23:32
von Alex_dn
And here is how the advertising column looks with illumination in dark lighting conditions:

20250725_204546.jpg
20250725_204804.jpg
20250725_205007.jpg

User’s manuals for both variants can be downloaded in “Downloads” tab on the product pages, and also here:

ZM-LS-001:
ZM-LS-001_EN.pdf
(585.24 KiB) 11-mal heruntergeladen

ZM-LS-002L:
ZM-LS-002L_EN.pdf
(642.68 KiB) 7-mal heruntergeladen

For some inspiration, I mixed 3D rendered images of advertising columns with AI generated images and used resulting pictures in design of information labels of these products:

Advertising_Column_Retro.jpg
Advertising_Column_Modern.jpg

Advertising columns are available here:

ZM-LS-001 – Retro variant:
https://www.1zu220-shop.de/Zmodell/Zube ... 50020.html

ZM-LS-002L – Illuminated modern variant:
https://www.1zu220-shop.de/Zmodell/Zube ... 50021.html

ZM-MS-023 and ZM-MS-024 - Double wire mesh fence sets

I decided to develop and produce something very common, but that was still missing in Z scale all the time – well-known double wire mesh fences that can be seen nowadays everywhere in Germany and also in other countries. These extremely popular and easily recognizable fences exist in different colors and heights. I decided to introduce multiple variants to satisfy needs of the most customers. Here are some samples from real life:


Bild
https://www.klettermax.de/media/catalog ... 3653-2.jpg

Bild
https://www.zaunmeister.de/media/image/ ... grun-1.jpg

Bild
https://www.zaunmeister.de/media/image/ ... trazit.jpg

Bild
https://zaundirekt.b-cdn.net/media/8c/3 ... width=3000

Bild
https://www.zaunmeister.de/media/image/ ... rzinkt.jpg

Bild
https://www.zaun-experten.de/media/cata ... nkt_16.jpg

The biggest challenge during development was to find out the right density of the mesh. This type of fences features very high density of wires which may look like a “solid wall” when scaled down to 1:220 scale. If forced me to push the limits of photo-etching technology further again. I chose 0.15 mm thick CuNi19 copper-nickel alloy and used the same width of the wires – 0.15 mm. This is an absolute minimum because the minimal width of etched element cannot be smaller than the thickness of used material.

Of course, the closer you approach the limits of a certain technology, the higher the risk of faults during production. Nevertheless, I managed to achieve very good results – from 80% to 100% of usable parts on the sheet. This is not ideal, but still a very good result, given the complexity of parts and their quite big size.

The fences are offered in two prototypical heights – 1.9 m and 1 m, or 8.8 and 5 mm in Z scale accordingly:

1.9 m scale height:
ZM-MS-023A.jpg

1.0 m scale height:
ZM-MS-024A.jpg

I decided to deliver them already airbrushed because unpainted fences look too unnatural and painting them by the customer can be too difficult task. Just like in real life, the fences are offered in three standard and the most popular colors – RAL 6005 “Moss Green”, RAL 7016 “Anthracite Grey” and zinc-plated:

RAL 6005 “Moss Green”:
ZM-MS-023A-3.jpg

Re: Zmodell novelties 2025

Verfasst: Fr 22. Aug 2025, 23:51
von Alex_dn
RAL 7016 “Anthracite Grey”:
ZM-MS-023B-3.jpg

Zinc-plated:
ZM-MS-023C-3.jpg

Airbrushing these fences is also a very difficult task because they become clogged too easily if wrong settings are used. Also, it is absolutely impossible to use industrial spray paints for this purpose – such a delicate structure clogs immediately right after the first blow. Despite of all these difficulties, I successfully found the right solution ratio for the paints that allowed to achieve desired quality. Of course, the fences come painted at both sides.

The fences are divided into several sections arranged in a frame. Each set consists of three long sections (around 100 mm) and two short sections (around 50 mm). The total length of the set of high fences (1.9 m) is 410 mm, the low fences (1.0 m) – 390 mm. Each set offers three gates – one double-door gate for cars and two single-door garden gates.

I added a set of drilling templates to the scope of delivery to make the installation easier:

ZM-MS-023A-2.jpg
ZM-MS-024A-2.jpg

Of course, the fences can be shaped into custom forms and/or cut or divided into smaller sections if necessary. Important: Of course, the paint around the bending and cutting lines may slightly crack or peel off in some cases – it is not a manufacturing fault, please I kindly ask to keep it in mind. In this case, I recommended manual fixing these areas with brush and some good acrylic email paint. For example, Revell offers RAL 6005, RAL 7016 and silver colors in their palette of email paints.

Here are detailed descriptions of each variant:

ZM-MS-023A – RAL 6005 “Moss Green”, 1.9 m scale height:
ZM-MS-023A-1.jpg

ZM-MS-023B – RAL 7016 “Anthracite Grey”, 1.9 m scale height:
ZM-MS-023B-1.jpg

ZM-MS-023C – Zinc-plated, 1.9 m scale height:
ZM-MS-023C-1.jpg

ZM-MS-024A – RAL 6005 “Moss Green”, 1.0 m scale height:
ZM-MS-024A-1.jpg

ZM-MS-024B – RAL 7016 “Anthracite Grey”, 1.0 m scale height:
ZM-MS-024B-1.jpg

ZM-MS-024C – Zinc-plated, 1.0 m scale height:
ZM-MS-024C-1.jpg

The fences can definitely be a very attractive and prototypically correct addition to each modern layout or diorama in Z scale depicting V-VI Eras. The new products are available here:

ZM-MS-023A – RAL 6005 “Moss Green”, 1.9 m scale height:
https://www.1zu220-shop.de/Zmodell/Zube ... 50026.html

ZM-MS-023B – RAL 7016 “Anthracite Grey”, 1.9 m scale height:
https://www.1zu220-shop.de/Zmodell/Zube ... 50027.html

ZM-MS-023C – Zinc-plated, 1.9 m scale height:
https://www.1zu220-shop.de/Zmodell/Zube ... 50029.html

ZM-MS-024A – RAL 6005 “Moss Green”, 1.0 m scale height:
https://www.1zu220-shop.de/Zmodell/Zube ... 50028.html

ZM-MS-024B – RAL 7016 “Anthracite Grey”, 1.0 m scale height:
https://www.1zu220-shop.de/Zmodell/Zube ... 50030.html

ZM-MS-024C – Zinc-plated, 1.0 m scale height:
https://www.1zu220-shop.de/Zmodell/Zube ... 50031.html

ZM-MS-025 – Old Town signboards

I decided to create a very common attribute of each Old Town in Germany and other countries – signboards made of forged metal. These well-known ornamental decorations always add a spirit of the old times to any building, especially when it is a railway layout or diorama depicting old Eras. Here are some samples from the real life:

Getreidegasse, Salzburg, Austria:
Bild
https://upload.wikimedia.org/wikipedia/ ... lzburg.jpg

Bild
https://upload.wikimedia.org/wikipedia/ ... lzburg.jpg

Colmar, France:
Bild
https://i.pinimg.com/474x/73/16/5f/7316 ... 7d323b.jpg

Re: Zmodell novelties 2025

Verfasst: Sa 23. Aug 2025, 00:06
von Alex_dn
And here is it – the set of 8 beautiful decorative signboards in Z scale, designed completely from scratch:

20250330_181416.jpg

I was inspired by real prototypes and designed a set of my own variants. Each of them is dedicated to a different industry or service – “Hotel”, “Bakery”, “Atelier”, “Café”, “Private Brewery”, “Key Shop”, “Winery” and “Shoemaker's Shop”.

20250330_181453.jpg

The signboards are made of 0.15 mm CuNi19 copper-nickel alloy and feature relief half-etched elements on one side. The set is airbrushed with a special dye “Dark Iron”. All signboards feature gold elements, while some of them are even double-colored – gold and copper. I painted all these elements manually with the thinnest artistic brush using special metallic paints with very fine grain – it is a true filigree work that demands a lot of time, skills, accuracy and patience. After this, the whole sets were airbrushed with satin lacquer for additional security.

Here is one more picture showing both sides of the set. As you can see, both sides feature gold and copper elements:

20250330_181624.jpg

Of course, I added drilling templates to the set. I made it from the transparent adhesive film with laser printed inscriptions:

20250414_224508.jpg

Transparent material helps to position the template on the building wall more precisely. In order to install the signboard, you need to drill two small holes in the wall of the building, carefully cut out the signboard from the frame, wet two holding pins with glue and fix it in place.

Here is a couple of pictures showing the set of signboards next to the old-style Z scale half-timbered building:

20250330_182150.jpg
20250330_182232.jpg

The new product is available here:
https://www.1zu220-shop.de/Zmodell/Zube ... 50032.html

ZM-MS-021S – Ultra fine heavy-duty chains

About two years ago, I already introduced fine-scale chains made with photo-etching technology:
https://www.1zu220-shop.de/Zmodell/Zube ... 47010.html

0.5 mm width of the first variant is already a very good result that was unseen in Z scale before. However, strictly saying, it corresponds only to very thick chains mostly used in heavy industry. My latest advancements in photo-etching technology brought me an idea to create one more new product that was barely possible before – ultra fine heavy-duty chains.

The new chains are only 0.3 mm wide – 40% narrower than the old ones and can therefore find even wider application in Z scale due to their even greater proximity to the prototype dimensions. The same material is used – 0.15 mm CuNi19 copper-nickel alloy. Here is a drawing that shows detailed dimensions of the new chains:

ZM-MS-021S-2.jpg

And here is a product photo. Like in previous case, I arranged the new chains in 10-piece sets:

ZM-MS-021S.jpg
ZM-MS-021S-1.jpg

The new chains won’t replace the old ones, both of them will be offered at the same time. The link to the new product is here:
https://www.1zu220-shop.de/Zmodell/Zube ... 47010.html

ZM-MS-035 – Chain barriers

It only took one step to create one more new product as a derivative from the previous one – chain barriers. This thing didn’t exist in Z scale before and, for sure, it will find its place on layouts with city scenes. Chain barriers are often used on city streets to separate sidewalks from the roadways for safety reasons and also to prevent illegal parking. Here is a sample from real life:

Dortmund.jpg
Image from Google Maps, © Google
https://maps.app.goo.gl/6J7MY8MtQyRianoP8

Re: Zmodell novelties 2025

Verfasst: Sa 23. Aug 2025, 00:21
von Alex_dn
Chain barriers are made from the same material – 0.15 mm CuNi19 copper-alloy and come already airbrushed with flat aluminum lacquer that imitates weathered zinc-plated metal very well. The barriers are arranged into the sets of three sections 10 cm each. The total length is 30 cm:

ZM-MS-035.jpg

The barrier pylons have stoppers, so it is easy to install them on layout at correct height all the way:

ZM-MS-035-1.jpg

Here is a detailed drawing showing all dimensions of the barriers:

ZM-MS-035-2.jpg

The barriers also come with drilling template for easy installation:

ZM-MS-035-4.jpg

The new product is available here:
https://www.1zu220-shop.de/Zmodell/Zube ... 50043.html


Now I would like to present a series of accessories that are designed to enrich one of the poorest categories in Z scale – automotive transportation. Basically, if we forget about small series products, virtually nothing is being produced in this category in Z scale, especially if we take into account only the articles produced using the highest quality technology, injection molding.

Right now, we only have Märklin 8904 set of IV Era cars that already exists for more than 25 years and comes not even in a form of finished models, but as a kit for self-assembly. It is not even a question that a major number of any other automotive transportation infrastructure accessories in Z scale is being stubbornly ignored by all existing big manufacturers.

Such a terrible situation can be somehow understood from the manufacturer’s point of view – it is very difficult to earn money on smaller items which can’t be sell for the same money as locomotives and other rolling stock while the investments required to produce them are comparable, and also the Z market is too small for this, and so on. However, we find ourselves in a vicious circle again – in order to sell more and generate higher profit, the manufacturers should develop the market by introducing more articles and accessories, but they don’t want to do it because “the market is too small”. Of course, I am not a big manufacturer, and I cannot resolve this never-ending problem on my own if I want it very much, but I hope my efforts are worth it.

ZM-MS-029A, ZM-MS-029B, ZM-MS-029C – Road barriers in three different styles

I’ve got an idea to develop something that we can see every day on the streets and roads – those well-known road barriers that surround construction or repair areas. Here are some real samples:

Bild
https://www.rsa-online.com/22/Absperrsc ... 022-01.jpg

Bild
https://www.rsa-online.com/22/Absperrsc ... 020-01.jpg

Bild
https://www.rsa-online.com/22/Absperrsc ... mplett.jpg

This item is offered in all other scales only except Z scale – that’s why I decided to fill this gap. Although the traffic rules allow any color for these barriers, I decided to offer only white variant and the most popular and recognizable. However, I designed three different styles in order to allow customers to choose according to their taste:

ZM-MS-029A, style 1:
Absperrgitter.jpg

ZM-MS-029B, style 2:
Absperrgitter1.jpg

ZM-MS-029C, style 3:
Absperrgitter2.jpg

The traffic barriers are made of thick 0.3 mm photo etched nickel silver and feature filigree half-etched elements. They are 100% true to scale and have dimensions of 10 x 5.5 mm. The barriers are airbrushed with two-layer lacquer coating (white metal primer + white lacquer). The warning stripes are printed on special ultrathin plastic adhesive film and manually applied separately.

The most challenging part in this project was how to implement the footplates. I abandoned an idea of making them from etched metal and chose 3D printing because it allows to achieve higher level of details and more prototypical look. The footplates are printed on SLA 3D printer in black resin using highest possible resolution.

Despite modern SLA 3D printers offer exceptional level of details, it was a tricky task to adopt the 3D model of the footplate in the way that allowed to obtain the maximum yield of usable parts. The size of a single footplate is only 3.6 x 1.8 x 0.7 mm – you can only imagine how small this part in Z scale is! Since the holes in the footplates are functional – they must accept barriers, road signs and other accessories, I had to increase their size in order to be printed correctly.

I prepared two different variants – single and double footplates:

ZM-FP-001.jpg
ZM-FP-002.jpg