Seite 1 von 2

Zmodell novelties 2026 Part II

Verfasst: Sa 27. Jun 2026, 23:38
von Alex_dn
Greetings to all,

Despite of extreme heat that is melting everything around us, I managed to prepare some new articles that I would like to introduce here in this thread. This time, it took a very long time to develop and produce some of them, but I hope very much the results are worth of all the efforts.

This is the second part of the new announces for this year. The first part is here:
viewtopic.php?t=25634


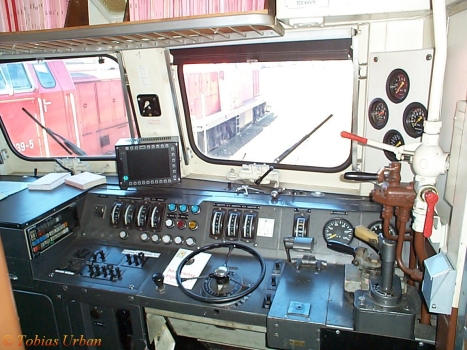
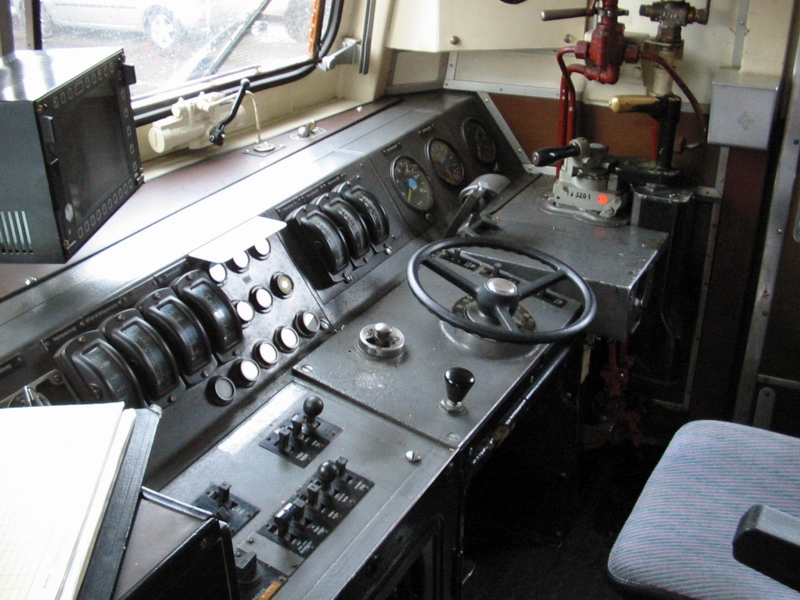
ZM-PL-150 – Driver’s cabin interior reproduction for BR 150 electric locomotives"

I decided to add the last remaining variant of attachable driver’s cabin interiors to the range of “classic” Marklin models – for BR 150 electric locomotive. I hesitated to do it before due to the complex internal structure of the locomotive housing in the driver’s cabin area. Later, I managed to achieve satisfying results with advanced shape of the stickers cut out on precise plotter.

I reproduced the driver’s cabin interior in all even the smallest details using vector graphics – strictly according to the real prototype:

http://www.db-loks.de/bilder/150-fst.jpg
http://www.lokomotive-online.de/Eingang ... stand1.JPG
(Unfortunately, the websites cannot provide HTTPS connection - that's why I cannot embed the pictures here and added only the links)

The interior details are printed on a special thin plastic adhesive film and come already precisely precut – no need to cut them out with scissors. Just carefully pick up the sticker with thin tweezers and attach it to the metal part as shown on the following picture:

ZM-PL-150.jpg

Of course, it is necessary to make sure that the metal part is absolutely clean from dust, oil and grease. Be prepared to disassemble the locomotive quite seriously. The metal parts with attached stickers look like this:

20260425_165616.jpg

The locomotive looks much better when no metal is shining through the windows, but the driver’s controls, doors and switches are visible instead:

20260425_171144.jpg
20260425_171150.jpg
20260425_171216.jpg
20260425_171410.jpg

The kit can be used with the following models: Märklin 88575, 88576, 88577, 88578, 88579.

The new product is available here:
https://www.1zu220-shop.de/Zmodell/Zube ... 57007.html


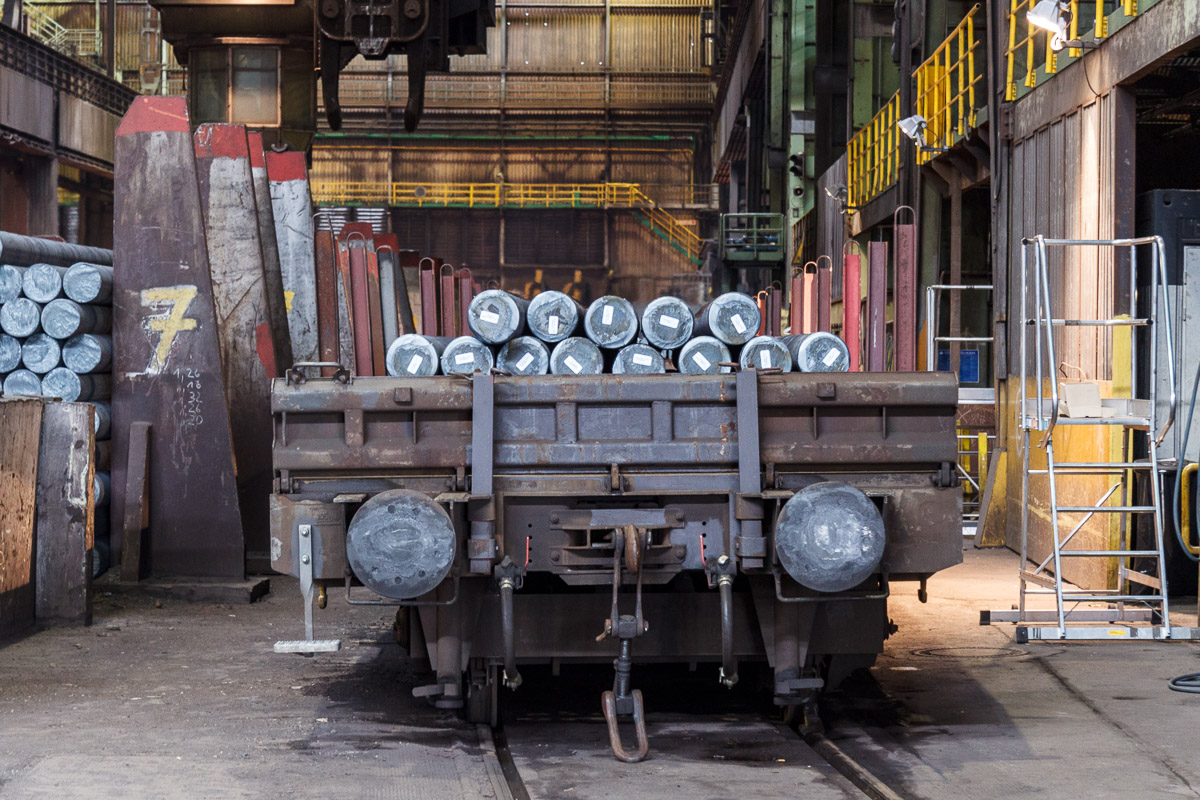
ZM-MRK-RES-021 – Steel bars load insert for type RES 4-axle flatcar

I decided to widen the range of load inserts for type RES 4-axle flatcar with another addition – round rolled steel bars. Here are a few prototype photos (however, depicting a different type of flatcar):

Bild
https://www.stahlbahn.de/img/A1-XXX-0103.jpg

Bild
https://www.stahlbahn.de/img/EOS_000_7172.jpg

Bild
https://www.stahlbahn.de/img/A1-XXX-0111.jpg

The load inserts for the type RES flatcar are made of a real steel that was naturally tempered and weathered to achieve natural look of freshly rolled metal. The metal bars are arranged in two rows containing of 8 and 6 pieces tied with thin metallic strips and divided by natural wooden spacers:

20260604_192251.jpg

The load insert is fitted with double-sided adhesive foam mounts to prevent sliding the load insert on the flatcar during motion:

20260604_192342.jpg

Here are some more pictures of the new load insert:

20260604_192138.jpg
20260604_192206.jpg

Re: Zmodell novelties 2026 Part II

Verfasst: Sa 27. Jun 2026, 23:47
von Alex_dn
20260604_192241.jpg

The new load type is available here:
https://www.1zu220-shop.de/Zmodell/Lade ... 57006.html


The pinnacle of micro-technology – a family of Z scale prototypical station clocks

Finally, I would like to introduce one of the most intricate and prototypical items I ever made so far – a range of station clocks in different variants. Upon exploring the market, it turned out that practically nothing is available in this area at all. Once available in the past but not produced anymore, old Z scale station clocks from Brawa, to be honest, look ugly, have wrong proportions and are out of scale at all. I decided to fill this gap and developed the most beautiful version of the station clock ever available in Z scale. I also tried my best to make the clock as close to the prototypical dimensions as possible.

Upon thinking about which technical approach to use, I decided to make the clock face truly three-dimensional – consisting of three separate parts: white background that also serves as a diffuser for the backlight, photo-etched clock face with clock hands and clear cover. Of course, all this would make the product much more complex in production, but I decided to give it a try anyway.

In terms of clock face’s own design, the main source of inspiration for me became the classic Deutsche Bahn clock used in III-VI Eras in different color variations. I decided not to add any logo in order to make the clock universal and usable in layouts of different countries. Here are a few samples of what became the prototype for the clock:

Bild
https://www.transportfever.net/wsc/atta ... c-1055-jpg

Bild
https://upload.wikimedia.org/wikipedia/ ... 28_ies.jpg

Bild
https://www.bahnbilder.de/1024/bahnhofs ... 406542.jpg

Here is the infographic that demonstrates the design of my station clock:

ZM-UHR-01A-3.jpg

Wall-mounted version:

ZM-UHR-02A-3.jpg

During considering the clock head size, I had to take into account what is technically possible: I decided that the outer diameter of the clock will be 4.5 mm and the thickness of the “drum” 2 mm. My idea was to integrate all the electronic components inside the clock head to make it possible to connect the clock directly to 12 V source without any external components.

I wanted to stay within 2 mm thickness of the clock drum because thicker clock would be too bulky and would not look beautiful enough. To achieve it, I had to carefully select suitable electronic components – special SMD 0603 LED with thickness of only 0.25 mm and SMD 0402 current-limiting resistors. These LED are very special, not very commonly used. The neutral white color tone of the LEDs with a slight pink-yellowish tint resembles the glowing of energy-saving lamps, which, by the way, were used in prototype DB station clocks. Here is one of these LEDs picked up with precise tweezers:

20260408_192840.jpg

I also had to use very thin material for the circuit board – only 0.13 mm. The diameter of the round circuit board is only 3.6 mm. Despite so tiny size, it accommodates as many as 6 different electronic components populated on both sizes and has 6 soldering pads:

2020_0103_012712_002.jpg
2020_0103_040007_002.jpg

I must admit that the panel with circuit boards with such uncommon parameters likely scared my PCB provider, and turned out to be noticeably more expensive than average circuit boards I usually order. It is not surprising at all – the efforts at the manufacturer’s side are much higher than normally, and the risk of defect during processing the panel with as many as 160 supersmall PCBs is much higher.

This is how the circuit boards are soldered on the automatic infrared heater:

20260409_025719.jpg
20260409_025738.jpg

It is worth noting that all components are populated manually, without any automation. After soldering is done, a careful inspection under the microscope is obligatory in order to make sure there are no any soldering defects that are, of course, possible due to an extreme density of components:

20260409_011941.jpg

After soldering the panel, all these tiny round circuit boards must be extracted from the frame. The burr at the edges must be removed with manual diamond grinder; otherwise, the boards will not fit into the clock frame:

20260409_195635.jpg

Re: Zmodell novelties 2026 Part II

Verfasst: Sa 27. Jun 2026, 23:52
von Alex_dn
20260409_200832.jpg

A small, only 3.6 mm diameter round circuit board is ready for the next production step:

20260408_202648.jpg

The next step is soldering the cables to the circuit boards. Like in many other cases, I used thin 0.28 mm stranded cables with PTFE coating here. The soldering requires extreme accuracy and patience and actually can be done only under the microscope:

20260408_211042.jpg
20260408_210839.jpg
20260408_210847.jpg
2020_0102_211811_002.jpg

Ready circuit board with cables looks like this:

20260408_211432.jpg

The same circuit board, side view. You can clearly see here how thin it is:

20260408_211455.jpg

The batch of ready circuit boards is ready:

20260410_025551.jpg

The next task was to prepare the plastic backgrounds and top covers of the clock face. I used special PET sheets for this purpose – testing different materials revealed that only PET material delivers the smoothest edges after cutting out. I improvised and built a stamping machine out of a Proxxon tabletop drilling machine, with a 4 mm leather punch fitted into the chuck:

20260410_031842.jpg

Re: Zmodell novelties 2026 Part II

Verfasst: Sa 27. Jun 2026, 23:56
von Alex_dn
20260410_134408.jpg

I made the clock housings using SLA 3D printing process. Despite very small size and thin walls, the quality turned out to be exceptional. On the next picture, these 3D-printed parts are prepared for painting:

20260406_023908.jpg

Another type of housing needs to be prepared for painting in a different way due to the lack of the holes for the pole stands:

20260406_032209.jpg

I decided to prepare 4 different color variants – black, gold, dark blue and light blue. The parts received two layers of paint coating. Both blue variants were additionally painted with silver layer at first for proper light insulation:

20260408_202826.jpg

The clock housing and the circuit board with LEDs fit perfectly with each other:

20260408_202732.jpg

The next step was the clock faces. I made them from 0.1 mm photo-etched nickel silver:

20260406_165947.jpg

The frames with metal etched parts are prepared for painting, too:

20260406_183306.jpg

After airbrushing the clock faces with black lacquer, the next incredible step followed – manual painting the clock’s second hand with red lacquer using ultra-thin brush:

2020_0102_204121_002.jpg
2020_0102_032215_002.jpg

I used Tamiya LP-21 “Italian Red” lacquer paint for this purpose. I used the absolute precision and enormous patience during painting. Obviously, the process was possible only under the microscope:

20260407_001500.jpg

Re: Zmodell novelties 2026 Part II

Verfasst: So 28. Jun 2026, 00:00
von Alex_dn
After complete drying, the clock faces had to be cut out of the frame. Once again, this step required extreme precision – if even the smallest part of the supporting pin will be left after the cutting, the clock face won’t fit into the housing. And again, I did this step under the microscope using knife with a fresh blade:

20260408_203308.jpg
2020_0130_172134_006.jpg

An organizer box is now full of different clock parts:

20260411_145421.jpg

I attempted to partially assemble the first clock head – the results are really stunning:

20260408_205833.jpg

Now, I had to make the pole stands for the clocks. I used 0.8 mm and 1.1 mm stainless steel tubes with very thin 0.1 mm walls for this. The tubes were cut on miniature cutting machine with diamond cutting disc. After this, the ends of the tubes were carefully processed with miniature diamond grinder bit and also treated with special bits for making inner and outer facets – it is necessary to allow the thin tube fit into the thick one flawlessly:

20260413_233617.jpg

After this, the tubes were fitted on a special template for precise joining:

20260416_233025.jpg

I used ultra-thin CA glue for this – a very small portion of glue was applied using precise needle picker under the microscope. On the following picture, you can see why the treatment of tube’s ends with special bits is necessary:

2020_0111_002728_002.jpg

Re: Zmodell novelties 2026 Part II

Verfasst: So 28. Jun 2026, 00:09
von Alex_dn
After gluing, I inserted the pole stands into a piece of styrofoam and prepared them for airbrushing. I inserted pieces of 0.5 mm fishing line into the tubes to prevent them from clogging during painting:

20260417_012738.jpg

To achieve zinc-plated-like surface, I painted the poles 2 times with glossy silver paint and added a layer of satin lacquer at the end.

Now, we approached the assembly steps. I carefully threaded the cables through the holes in the housings:

20260415_145259.jpg

To proceed with further assembly steps, I used precise mini-vice that was already discussed here – very useful and convenient:
viewtopic.php?t=25401

20260414_192605.jpg
20260414_192929.jpg
20260414_194102.jpg

To adjust the height, a special 1 mm plastic washer was added:

20260415_150529.jpg

All the following images depicting different assembly steps have been taken under the microscope – as you have already mentioned, using this device is the only way to produce these clocks – virtually all steps are done solely under the microscope:

20260414_195846.jpg
20260415_150006.jpg
20260415_150341.jpg
2020_0108_194719_002.jpg

Re: Zmodell novelties 2026 Part II

Verfasst: So 28. Jun 2026, 00:21
von Alex_dn
2020_0108_204338_002.jpg
2020_0109_151118_002.jpg
2020_0109_150742_002.jpg

After complete assembly of 3-component clock face, the outer transparent cover was fixed in place with two tiny drops of ultrathin CA glue picked and applied by precise needle picker. After this, the clock head was installed on the pole stand and again fixed with a very small drop of thin CA glue:

2020_0120_002238_002.jpg

Then, the time has come to assemble another variant of the station clock – on a decorative forged iron frame. The idea of making this variant is my own. I did not find any clocks like this in Germany, but some similar variants were found on the pictures of old railway station buildings in the UK. Here is a couple of my own AI visualizations of alleged “prototype”:

Gemini_Generated_Image_htpzqzhtpzqzhtpz1.jpg
Gemini_Generated_Image_3nnxag3nnxag3nnx1.jpg

Of course, the scope of use of these vintage-style clocks is not limited only to railway stations – this small, but very eye-catching accessory can be mounted, for example, on the old hotel building or anywhere else in the Old Town scenery.

The following infographic demonstrates the design of the vintage wall clock in details:

ZM-UHR-03B-3.jpg

I decided to use a unique approach here that allowed a cable-less design of the clock: the decorative frame consists of two parts – each of them conducts the power to the circuit board without any visible cables. To prevent the short circuit, the parts are airbrushed with three layers of paint – primer for metal and two layers of Tamiya LP-54 “Dark Iron”. This paint brings a very realistic look to the parts:

20260413_002921.jpg

After painting, the ends of the mounting pins must be cleaned from paint by careful scratching using sharp knife – the cables will be soldered here:

20260504_011507.jpg

The assembly of this variant of the clock is the most complicated, extremely laborious and, I would say, exhausting. First, you have to insert the one half of the decorative frame into the clock housing, then carefully place the circuit board inside it; after this, the second half of the frame must be inserted. Only after this, you have to solder the ends of both halves of the frames to the circuit board that is already inside the clock housing! And you have to do it all extremely carefully and precisely, and again, only under the microscope:

2020_0129_022227_005.jpg

Re: Zmodell novelties 2026 Part II

Verfasst: So 28. Jun 2026, 00:26
von Alex_dn
2020_0107_011148_002.jpg
2020_0127_221442_003.jpg

After this, both halves of the decorative frame need to receive a final precise alignment and glued to each other permanently with CA glue:

2020_0126_184401_002.jpg

Then, the “standard” procedure of inserting the parts of the clock face and fixing everything with CA glue follows. After this, thin PTFE stranded cables are soldered to the rear pins, and we eventually get a finished product:

2020_0107_014404_002.jpg
20260413_013638.jpg

All five variants of station clocks come in special protective plastic boxes and feature detailed installation instructions:

20260620_213307.jpg

Here you can see the pictures of the finished products:

ZM-UHR-01A - Station platform clock, Germany, Era IV-V:

20260620_222207.jpg
20260620_222013.jpg
20260620_222034.jpg

Illumination is ON:

20260620_222157.jpg

Re: Zmodell novelties 2026 Part II

Verfasst: So 28. Jun 2026, 00:31
von Alex_dn
20260620_222238.jpg

ZM-UHR-01B - Station platform clock, Germany, Era V-VI:

20260620_232200.jpg
20260620_232227.jpg
20260620_232235.jpg
20260620_232308.jpg

Illumination is ON:

20260620_232208.jpg
20260620_232219.jpg
20260620_232245.jpg

ZM-UHR-02A Railway Station Clock, Germany, Era V-VI:

20260620_233437.jpg
20260620_233512.jpg

Re: Zmodell novelties 2026 Part II

Verfasst: So 28. Jun 2026, 00:35
von Alex_dn
20260620_233553.jpg

Illumination is ON:

20260620_233443.jpg
20260620_233521.jpg

ZM-UHR-03A Railway Station Wall Clock, Era I-III, black:

20260620_234511.jpg
20260620_234541.jpg

Illumination is ON:

20260620_234517.jpg
20260620_234533.jpg

ZM-UHR-03B Railway Station Wall Clock, Era I-III, gold:

20260621_001142.jpg
20260621_001208.jpg

Illumination is ON:

20260621_001148.jpg